
Table of Contents
Create Lambda IAM Policy and Role
- Open up the IAM roles page within the AWS Console, click policies and choose create new policy.
- Click the Json option and copy the Json below into the policy editor.
- Name the policy – AWS-Microservices-project and click create.
- Go to Roles on the side bar and create a new role
- Set trusted entity to AWS Service, and Use Case to Lambda.
- On the permission page find AWS-Microservices-project and select it.
- Name the new role – lambda-apigateway-role
{
    "Version": "2012-10-17",
    "Statement": [
        {
            "Sid": "Stmt1428341300017",
            "Action": [
                "dynamodb:DeleteItem",
                "dynamodb:GetItem",
                "dynamodb:PutItem",
                "dynamodb:Query",
                "dynamodb:Scan",
                "dynamodb:UpdateItem"
            ],
            "Effect": "Allow",
            "Resource": "*"
        },
        {
            "Sid": "",
            "Resource": "*",
            "Action": [
                "logs:CreateLogGroup",
                "logs:CreateLogStream",
                "logs:PutLogEvents"
            ],
            "Effect": "Allow"
        }
    ]
}
Creating the Lambda Function
- In the Lambda console click “Create Function”
Select “Author from scratch”. Use name LambdaFunctionOverHttps , select Python 3.12 as Runtime. Under Permissions, select “Use an existing role”, and select lambda-apigateway-role that we created, from the drop down
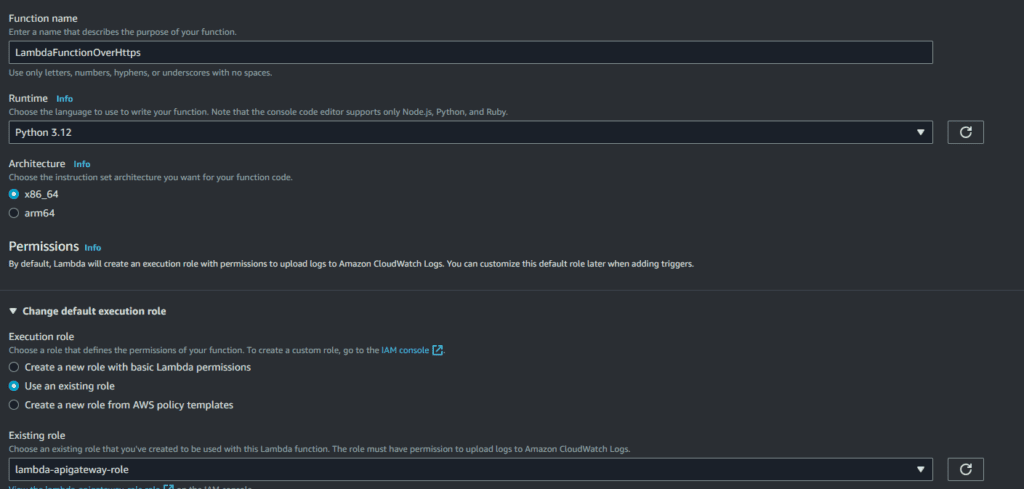

3. Click Create function
Replace the default code in the lambda_function with example python code below.
from __future__ import print_function

import boto3
import json

print('Loading function')


def lambda_handler(event, context):
    '''Provide an event that contains the following keys:

      - operation: one of the operations in the operations dict below
      - tableName: required for operations that interact with DynamoDB
      - payload: a parameter to pass to the operation being performed
    '''
    #print("Received event: " + json.dumps(event, indent=2))

    operation = event['operation']

    if 'tableName' in event:
        dynamo = boto3.resource('dynamodb').Table(event['tableName'])

    operations = {
        'create': lambda x: dynamo.put_item(**x),
        'read': lambda x: dynamo.get_item(**x),
        'update': lambda x: dynamo.update_item(**x),
        'delete': lambda x: dynamo.delete_item(**x),
        'list': lambda x: dynamo.scan(**x),
        'echo': lambda x: x,
        'ping': lambda x: 'pong'
    }

    if operation in operations:
        return operations[operation](event.get('payload'))
    else:
        raise ValueError('Unrecognized operation "{}"'.format(operation))
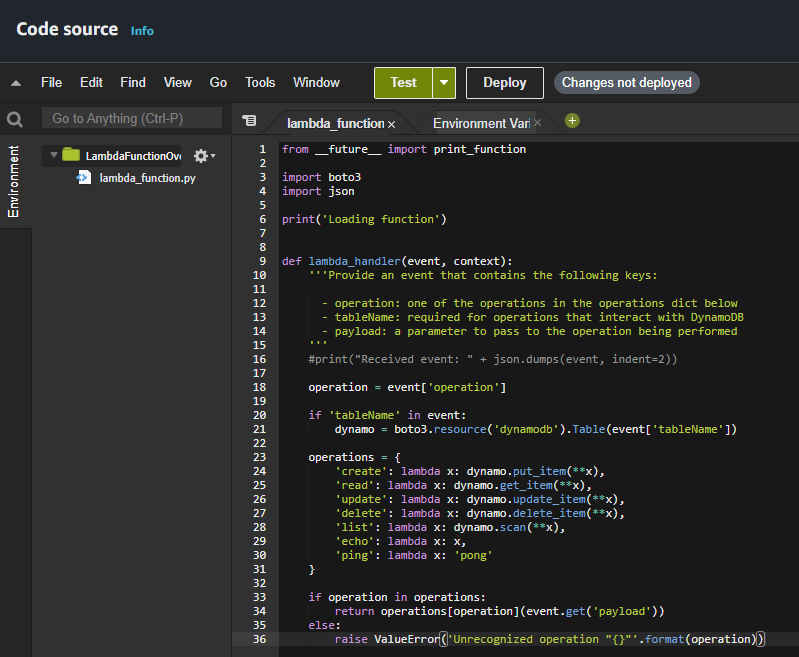

Testing The Lambda Function
Click Test and create new event, Copy the code from below and paste it into the Event JSON Tab.
{
    "operation": "echo",
    "payload": {
        "somekey1": "somevalue1",
        "somekey2": "somevalue2"
    }
}
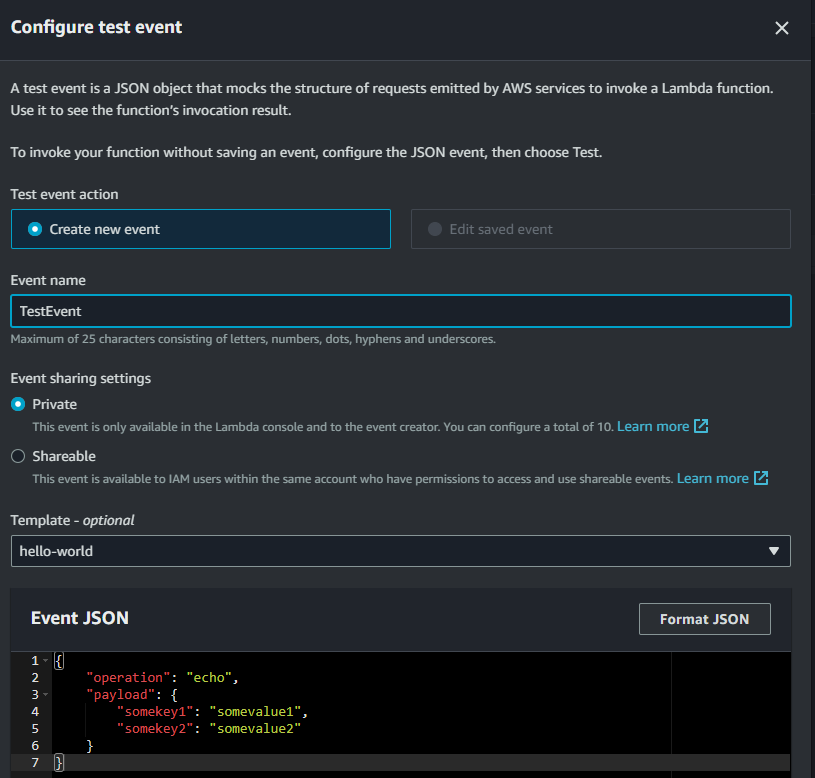

Click Envoke and you should get a “StatusCode”: 200 response.
Test Event Name
(unsaved) test event
Response
{
  "statusCode": 200,
  "body": "\"Hello from Lambda!\""
}
Function Logs
START RequestId: b3a9797a-0907-4c9d-b494-263fc67c3240 Version: $LATEST
END RequestId: b3a9797a-0907-4c9d-b494-263fc67c3240
REPORT RequestId: b3a9797a-0907-4c9d-b494-263fc67c3240	Duration: 1.92 ms	Billed Duration: 2 ms	Memory Size: 128 MB	Max Memory Used: 33 MB	Init Duration: 78.79 ms
Request ID
b3a9797a-0907-4c9d-b494-263fc67c3240
Create DynamoDB Table
- Open the DynamoDB console.
- Choose Create table.
- Create a table with the following settings.
- Table name – lambda-apigateway
- Primary key – id (string)
- Sort key – can be left blank
- Table settings – Default settings.
- Choose Create.


Creating the API Gateway
- Go to API Gateway console
- Click Create API
- Scroll down and select “Build” for REST API
- Give the API name as “DynamoDBOperations”, keep everything as is, click “Create API


You should end up with a empty API Gateway like.
5.Now, Click ‘Create resource’
6. Input “DynamoDBManager” in the Resource Name, Resource Path will get populated. Click ‘Create Resource’
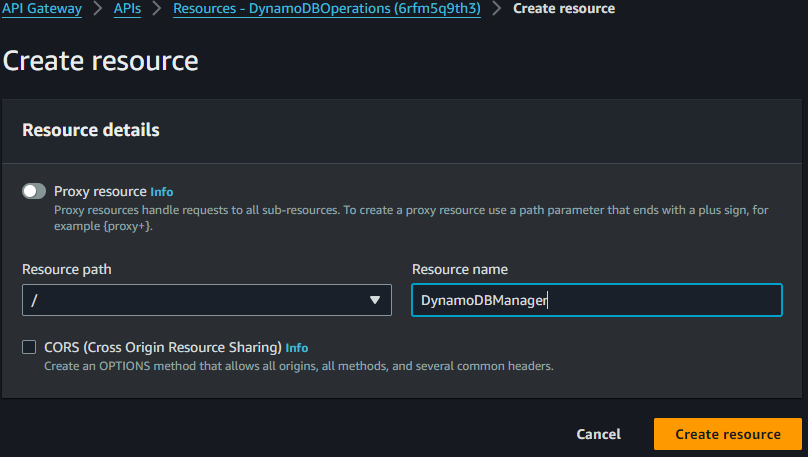

7. Let’s create a POST Method for our API. With the “/dynamodbmanager” resource selected, click “Create Method”.
8. The method type should be set to POST.
9. Set the integration type to a Lambda function.
10. Underneath the Lambda function, the region should already be selected. Provide the Lambda function name or alias.


Deploying the API
In this step, you deploy the API that you created to a stage called prod.
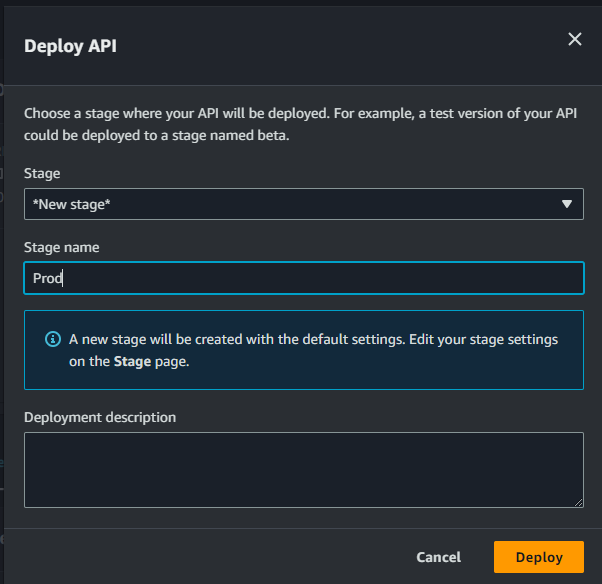
- select Deploy API
- Stage – select *New Stage*
- Stage name – Prod
- Deploy.

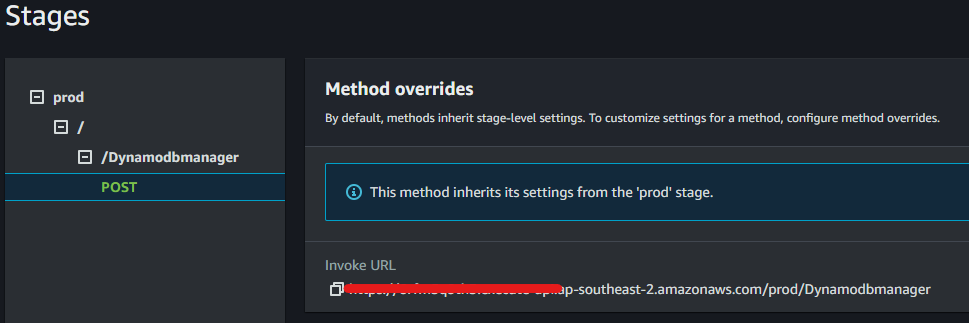
We’re all set to run our solution! To invoke our API endpoint, we need the endpoint url. In the “Stages” screen, expand the stage “Prod”, select “POST” method, and copy the “Invoke URL” from screen

Running our solution
There are a few ways you can call the REST API: using Postman, a curl command, but I’ll be using PowerShell. for the $uri replace that with the URL that we copied from above. ID and Name can be set to whatever you want to right to the DB.
$uri = "https://ReplaceMe.execute-api.ap-southeast-2.amazonaws.com/Prod/DynamoDBManager"
$body = @{
    operation = "create"
    tableName = "lambda-apigateway"
    payload   = @{
        Item = @{
            id   = "1"
            name = "Nick"
        }
    }
} | ConvertTo-Json
$response = Invoke-RestMethod -Uri $uri -Method Post -Body $body -ContentType "application/json"
# Output the response
$response
If everything is configured correctly, you should get a HTTP Status Code 200.


Troubleshooting
On my first run through of this project, I encountered the following error. Since this error is an ‘access denied’ error, I checked my IAM policy to see which policies are applied to the role attached to my Lambda instance.
errorMessage : An error occurred (AccessDeniedException) when calling the PutItem operation: User:
               arn:aws:sts::078689321816:assumed-role/LambdaOverHTTPsToDynamoDB-role-0vrlawj8/LambdaOverHTTPsToDynamoDB is not authorized to perform: dynamodb:PutItem
               on resource: arn:aws:dynamodb:ap-southeast-2:078689321816:table/lambda-apigateway because no identity-based policy allows the dynamodb:PutItem action
errorType    : ClientError
requestId    : 5724f5dd-53b2-4d3c-8caf-de8b54e917b9
stackTrace   : {  File "/var/task/lambda_function.py", line 34, in lambda_handler
                   return operations[operation](event.get('payload'))
               ,   File "/var/task/lambda_function.py", line 24, in
                   'create': lambda x: dynamo.put_item(**x),
               ,   File "/var/runtime/boto3/resources/factory.py", line 580, in do_action
                   response = action(self, *args, **kwargs)
               ,   File "/var/runtime/boto3/resources/action.py", line 88, in __call__
                   response = getattr(parent.meta.client, operation_name)(*args, **params)
               ...}
Note to self: it’s helpful to attach the correct policy to the role! With the correct policy attached, it’s working as expected!
Here we create the row in the database via a post request and receive the http status response 200.


Implementing logging into AWS API Gateway
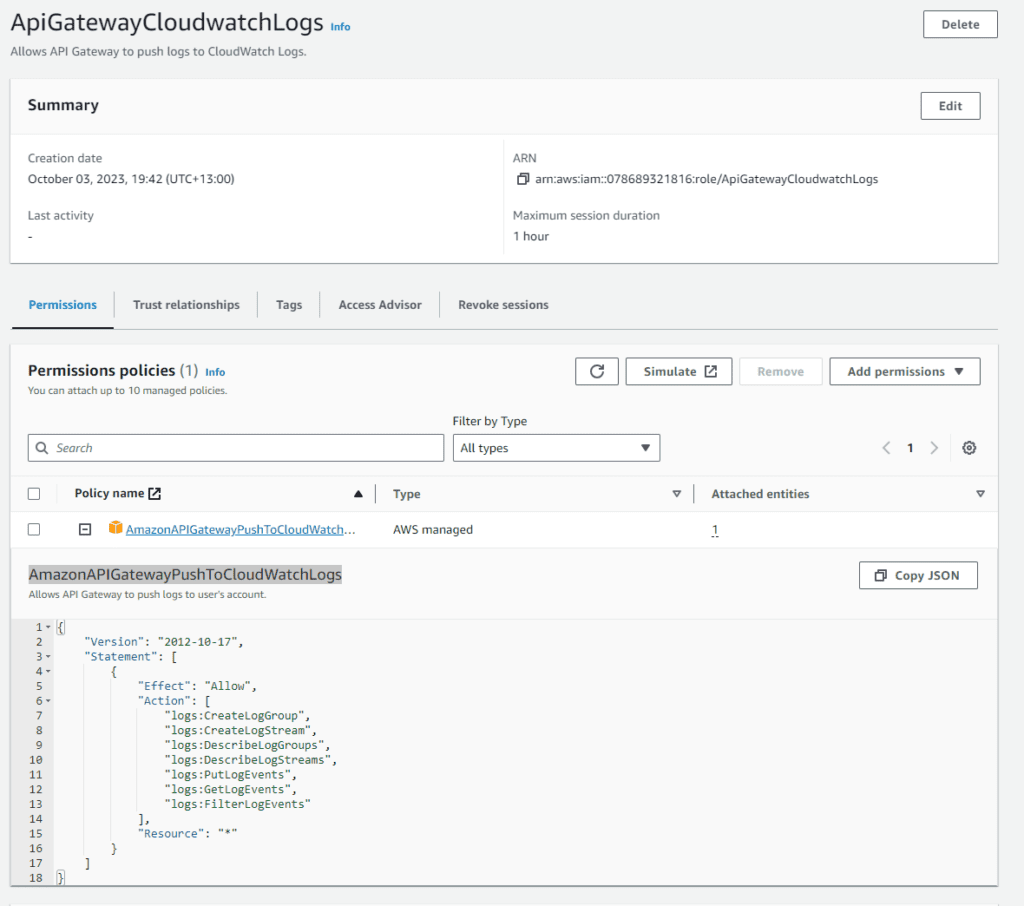

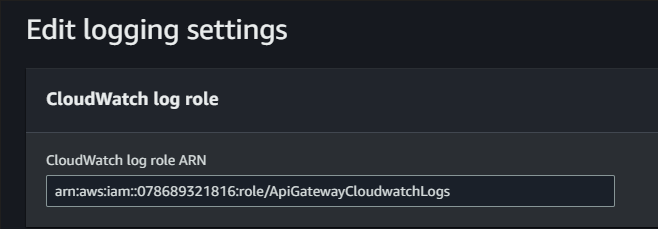
Grab the ARN from the new Role and head back over to your API Gateway.
Go into -> API Gateway -> APIs -> Settings -> Edit logging settings
And paste the ARN from the role in

Now to enable logging on the API.
Going into our API -> Stages -> Logs and tracing Select the appropriate log level.
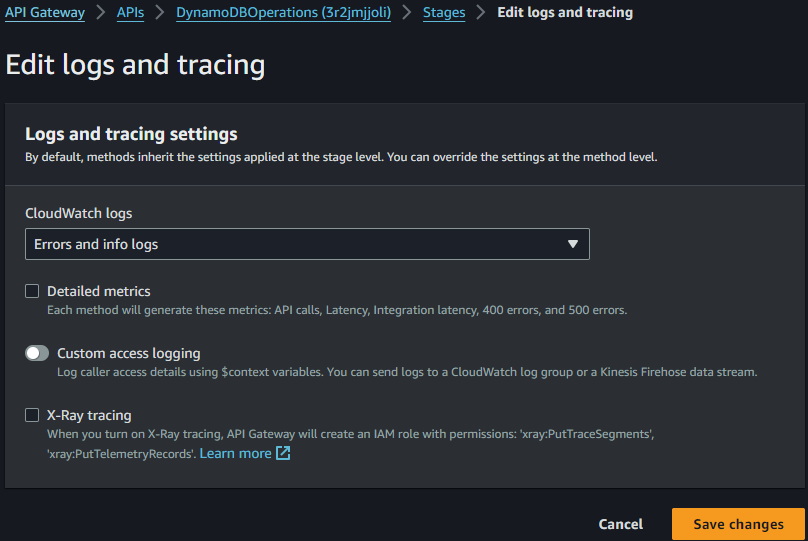

Generate some logs using the powershell command shown earlier.
Going into – > CloudWatch -> Log groups ->/aws/lambda/LambdaOverHTTPsToDynamoDB
you should see some logs!


Adding an API Key
Adding a layer of secuirty onto the solution, we’re going to be adding an API key so only those who know the API key can access the API!
- Go to the API Gateway console and select your API.
- Expand the method (POST in my case) where you want to require the API key, select the method.
- In the Method Request box, click edit and then tick “API Key Required.”
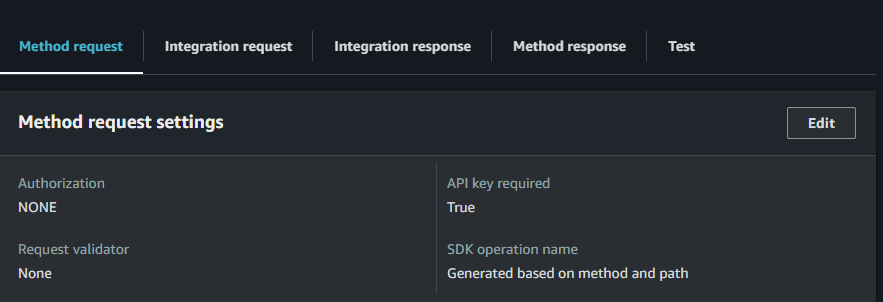

Next, we need to create the API Key:
- In the navigation pane, choose ‘API Keys’.
- Choose ‘Create API Key’.
- Provide a name and a description for the API key.
Now, to tie the API key to your Rest API, we need to create a usage plan:
- In the API Gateway main navigation pane, choose ‘Usage Plans’.
- Choose ‘Create’.
- Fill out the configuration for the usage plan. You can define throttling and quota limits. I’ve set my Rate and Burst low as this is simply a home project.
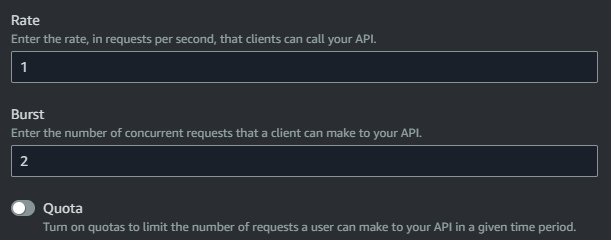

lets add the API into our PowerShell script.
$uri = "https://3r2jmjjoli.execute-api.ap-southeast-2.amazonaws.com/Prod/DynamoDBManager"
$apiKey = "NotMyAPIkey.." # Replace with your actual API key
$headers = @{
    "x-api-key" = $apiKey
    "Content-Type" = "application/json"
}
$body = @{
    operation = "create"
    tableName = "lambda-apigateway"
    payload   = @{
        Item = @{
            id   = "2"
            name = "Nick12345"
        }
    }
} | ConvertTo-Json
$response = Invoke-RestMethod -Uri $uri -Method Post -Headers $headers -Body $body
# Output the response
$response
Restricting Roles and Policies
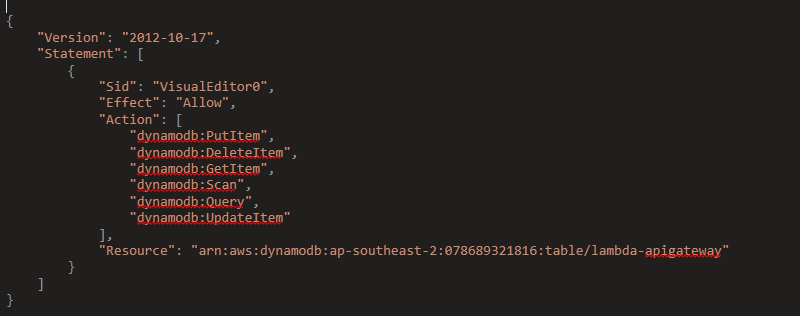
It’s always best practice to apply principle of least privilege when creating roles, Currently the role that allows my Lambda instance to access the Dynamo DB does not apply principle of least privilege. In the first picture you can see “Resource”: “*” This means that the Lambda function has permissions to perform any DynamoDB action (PutItem, DeleteItem, GetItem, Scan, Query, UpdateItem) on any DynamoDB table within the user’s account.
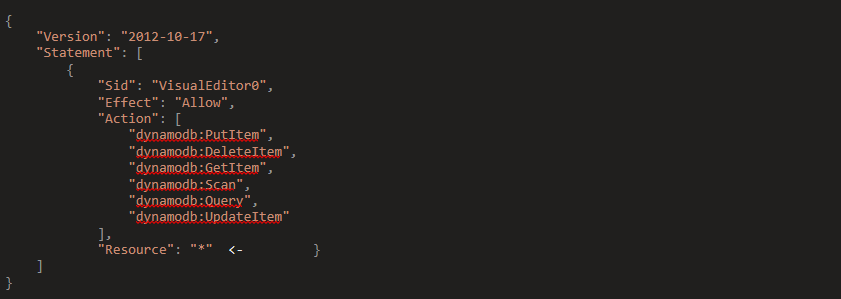

Adding in the ARN for our Dynamo DB Table , restricts this policy down to only Lambda to access that Table.

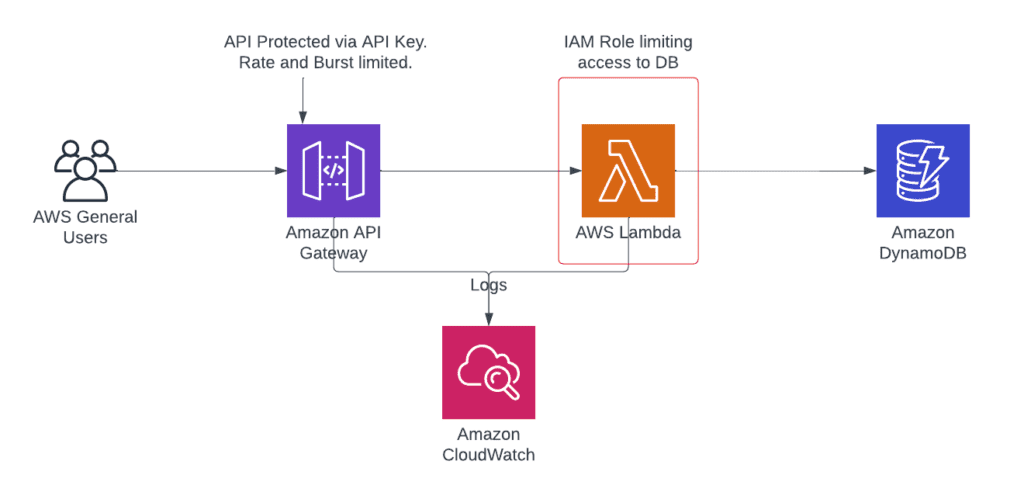
This is the updated current solution architecture.

Scaling the project.
Lets step through each component of our architecture and see where it can be scaled, starting with the API Gateway
Our API needs to be called from all over the world so changing the Endpoint type from regional to Edge-Optimised, Allows us to take advantage of the AWS internal Network, routing traffic to our gateway quicker.


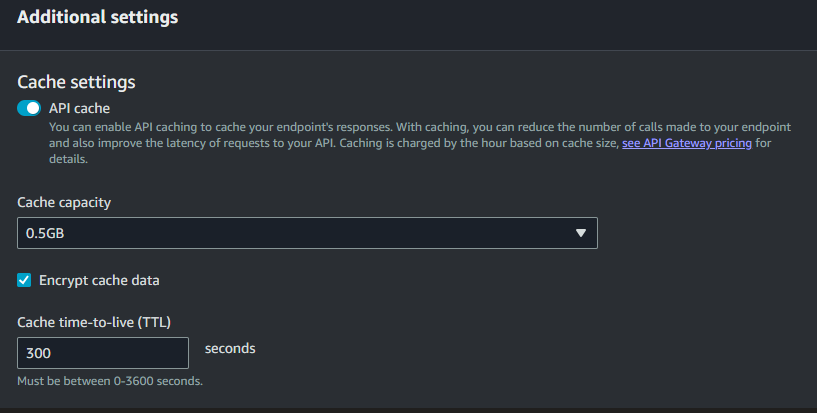
The API Gateways also offers the option to enable caching of endpoint responses, which is a useful way of reducing the load on downstream components.

Do we need to scale Lambda? Lambda auto scales on its own spinning up instances and closing them when required, So no adjustments to this is required.
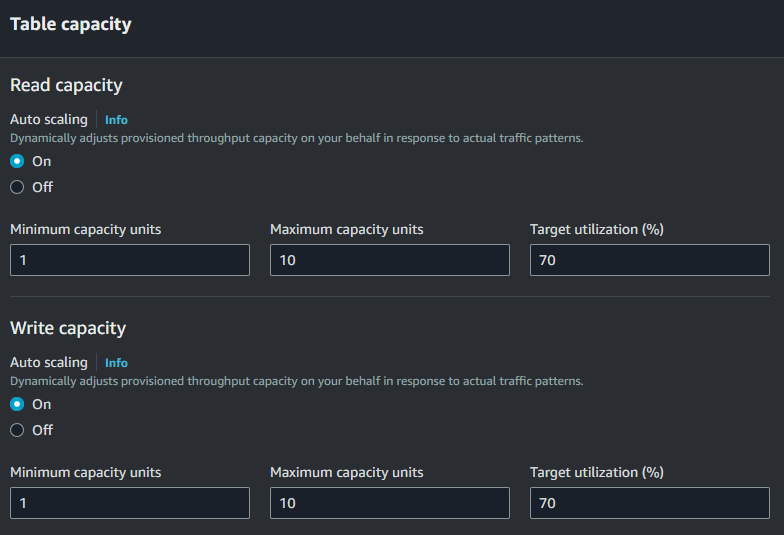
Dynamo DB on the otherhand does give us options to set scaling wise, On-Demand and Provisioned.
- OnDemand simply leaves the scaling to AWS to sort, this is useful when you have erratic usage.
- Provisioned, enables you to choose read and wrote capacity


OnDemand simply leaves the scaling to AWS to sort, this is useful when you have erratic usage.
Provisioned, enables you to choose read and wrote capacity

Conclution
That’s the project wrapped, you’ve utilised AWS Serverless architecture to build out an application that allows you to POST and GET table information from an AWS Dynamo DB, Securing the project and making sure it’s scalable!
