Deploying Static Websites with Azure Blob Storage, AWS Route 53, and Github Actions
Table of Contents
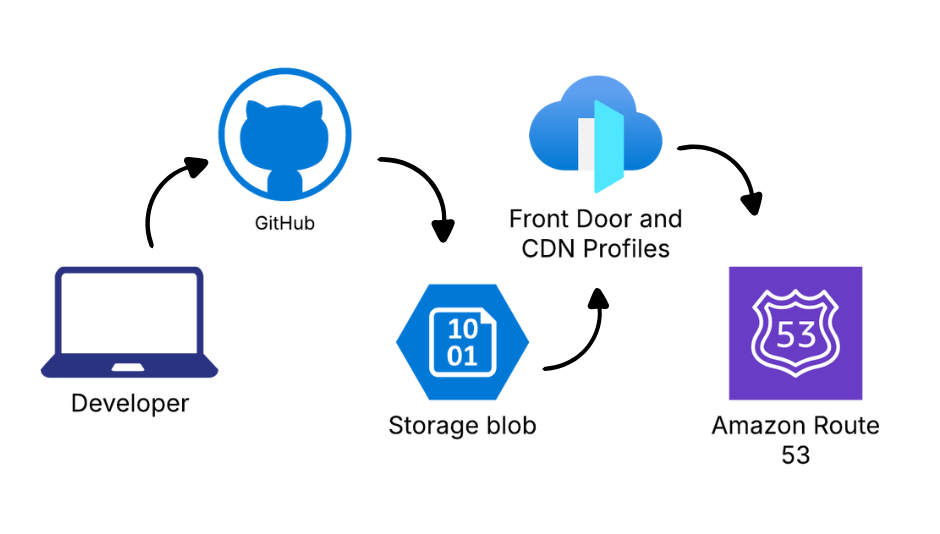
Static websites offer numerous advantages including improved performance, enhanced security, and reduced hosting costs. In this guide, we’ll walk through deploying a static website using Azure Blob Storage for hosting, AWS Route 53 for DNS management, and github actions for continuous integration and deployment.
This architecture provides a robust, scalable solution that leverages the strengths of multiple cloud providers while maintaining simplicity and cost-effectiveness.
Core Architecture
Frontend Hosting (Azure)
- Azure Storage Account with static website hosting enabled
- Azure FrontDoor for content delivery optimization and HTTPS support
- Custom domain integration
DNS Management (AWS)
- AWS Route 53 for DNS management and domain registration
- CNAME records pointing to Azure CDN/Storage endpoints
Deployment Pipeline (GitHub Actions )
- GitHub Actions for continuous integration and delivery
- Automated build, test, and deployment processes
- Infrastructure as Code (IaC) for consistent environment creation
Prerequisites
Before getting started, ensure you have:
- An Azure account with an active subscription
- An AWS account with access to Route 53
- A domain name (we’ll use cloud-corner.com in this example)
- Your static website files ready for deployment
Implementation
Step 1 Creating an Azure Resource Group
First thing we need to do is to create a resource group to host all our project resources in.
New-AzResourceGroup -Name "Cloud-Corner.com" -Location "australiaeast"
Step 2: Setting Up Azure Storage for Static Website Hosting
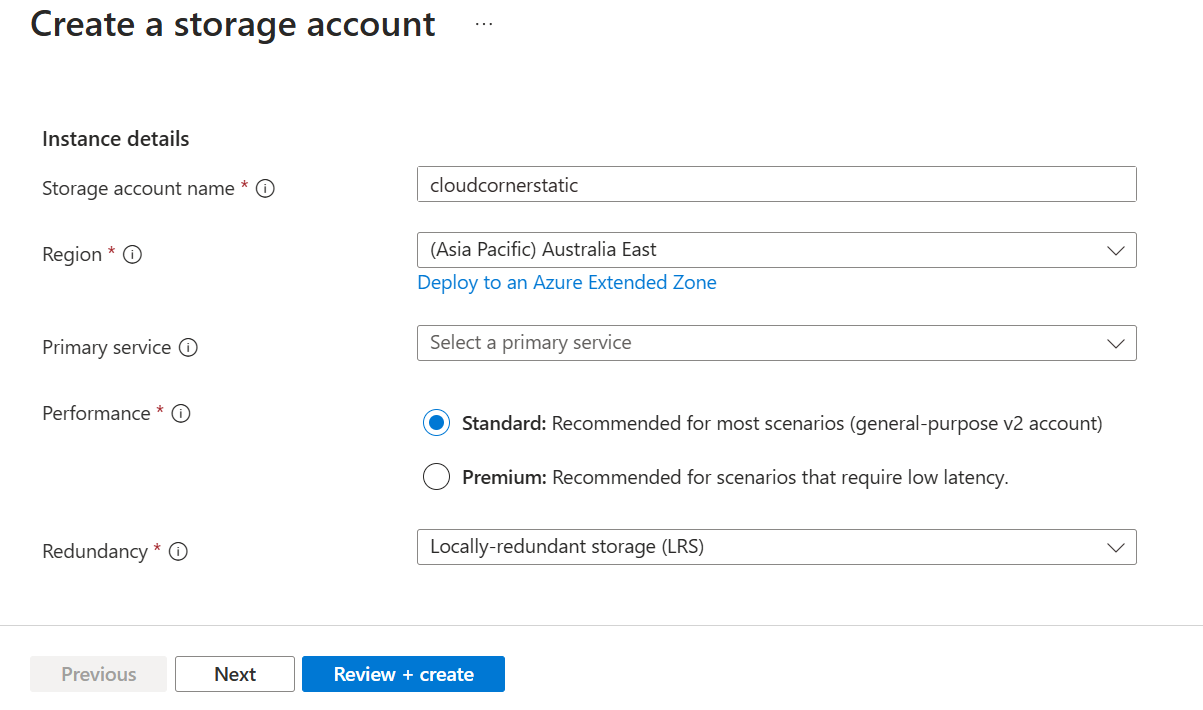
Create a Storage Account:
Within the Azure portal load up the Storage account dashboard
Click “Create”
Select your subscription and the resource group you created in Step 1
Enter a unique storage account name (e.g., cloudcornerstatic)
Choose Region, Performance (Standard), and Redundancy (LRS is sufficient for most static sites)
Click “Review + create” and then “Create”
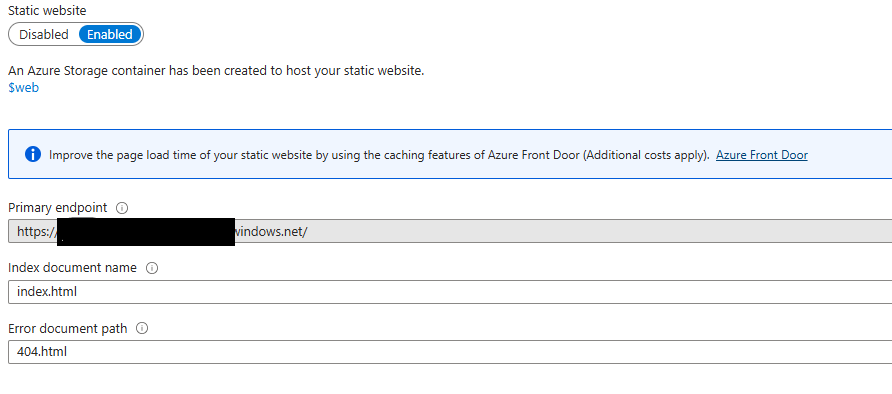
Enable Static Website Hosting:
Once your storage account is created, navigate to it
- In the left menu, scroll down to “Static website” under “Data management”
- Click “Enabled” to enable static website hosting
- Set “Index document name” to “index.html”
- Set “Error document path” to “404.html”
- Click “Save”
Note the “Primary endpoint” URL - you’ll need this later
Upload Your Website Files:
- In the left menu, click “Data Store” and select “Containers” and find the “$web” container that was created
- Upload your static website files to this container
- Ensure your main page is named “index.html”
Step 3: Setting Up Azure Front Door
Azure Frontdoor improves performance and provides HTTPS support for your custom domain:
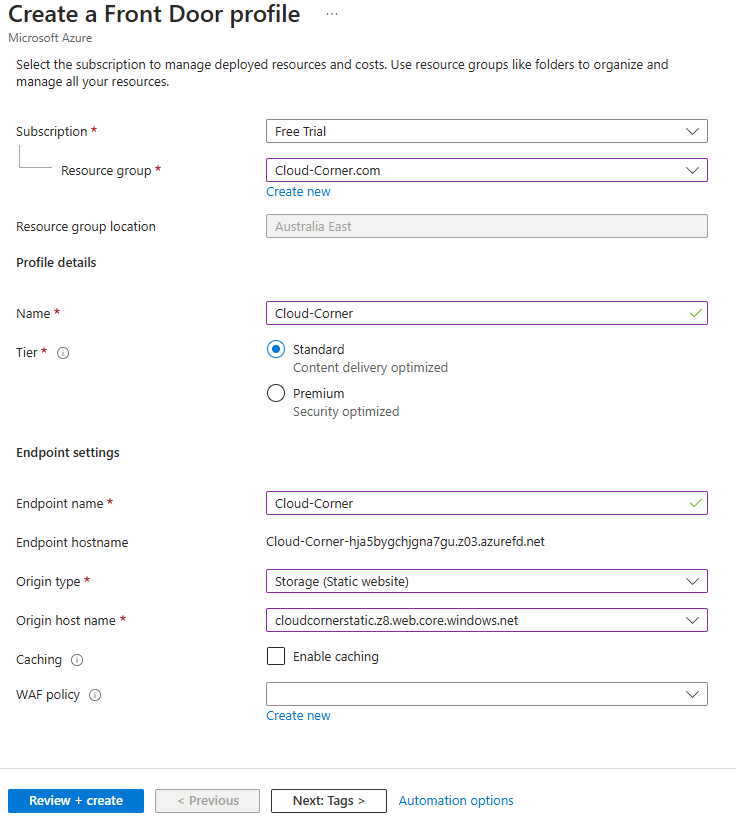
Create a CDN Profile:
- In the Azure Portal, load Azure Front Door
- Click Create and leave the default options
- At this point you might run into this error
 If so run this powershell command to register
- At this point you might run into this error
Register-AzResourceProvider -ProviderNamespace Microsoft.CDN
- Link the Front Door profile to the resource group
- Enter a Name and an Endpoint name
- Choose “Standard Microsoft” for the pricing tier
- set the origin type to Storage (Static Website)
- Set the Host anme to the hostname of your Storage (this should be the primary Endpoint we took not eof earlier)
- Click “Next” and “Create”
Configure Custom Domain:
- In your CDN profile, click on the endpoint you created
- Click “Custom domains” in the left menu
- Click “+ Custom domain”
- Enter your domain name (e.g., www.cloud-corner.com)
- Click “Add”
- Azure will provide you with a CNAME record value that you’ll need to add to your DNS settings
Enable HTTPS for Custom Domain:
- In the custom domain settings, click “Custom domain HTTPS”
- Select “On” for “Custom domain HTTPS”
- Choose “CDN managed” for certificate management type
- Click “Save”
- This process may take several hours to complete
Step 4: Configuring AWS Route 53 for DNS Management
Now we’ll set up DNS in AWS Route 53:
- In your hosted zone, click “Create Record”
- Set “Record name” to “www”
- Choose “CNAME” for “Record type”
- Enter the Azure CDN endpoint hostname (from Step 2) in the “Value” field
- Click “Create records”
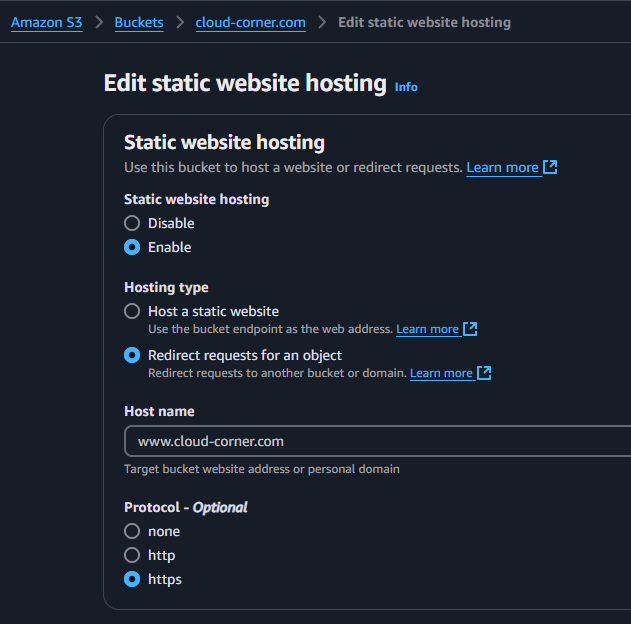
Set Up Root Domain Redirection:
- To redirect root domain (cloud-corner.com) to www subdomain (www.cloud-corner.com)
- Create an S3 bucket with the same name as your domain
- Enable “Static website hosting” and select “Redirect requests”
- Set the redirect target to your www subdomain
- Create an A record in Route 53 that points to this S3 bucket
Step 5: Setting Up CI/CD with GitHub Actions
Finally, let’s automate the deployment process using GitHub Actions:
Log in to GitHub and create a new repository and Push your static website code to this repository
In the Azure Portal, create a service principal with access to your resources:
az ad sp create-for-rbac --name "github-actions-sp" --role contributor \
  --scopes /subscriptions/{subscription-id}/resourceGroups/{resource-group} \
  --sdk-auth
Save the JSON output - you’ll need it in the next step
- In your GitHub repository, go to “Settings” > “Secrets and variables” > “Actions” Add the following secrets:
AZURE_CREDENTIALS: The entire JSON output from the Azure CLI command
STORAGE_ACCOUNT_NAME: Your storage account name
RESOURCE_GROUP: Your resource group name
FRONTDOOR_PROFILE_NAME: Your Front Door profile name
FRONTDOOR_ROUTE_NAME: Your Front Door route name
- Create a .github/workflows directory in your repository and Create a file named deploy.yml with the following content:
name: Deploy to Azure

on:
  push:
    branches: [ main ]
  workflow_dispatch:

jobs:
  build-and-deploy:
    runs-on: ubuntu-latest
    steps:
      - uses: actions/checkout@v3
        with:
          submodules: true  # Fetch Hugo themes (true OR recursive)
          fetch-depth: 0    # Fetch all history for .GitInfo and .Lastmod

      - name: Setup Hugo
        uses: peaceiris/actions-hugo@v2
        with:
          hugo-version: '0.105.0'
          extended: true

      - name: Build
        run: hugo --minify

      - name: Login to Azure
        uses: azure/login@v1
        with:
          creds: ${{ secrets.AZURE_CREDENTIALS }}

      - name: Upload to Azure Storage
        uses: azure/CLI@v1
        with:
          inlineScript: |
            az storage blob upload-batch \
              --account-name ${{ secrets.STORAGE_ACCOUNT_NAME }} \
              --auth-mode login \
              --source ./public \
              --destination '$web' \
              --overwrite

      - name: Purge Front Door Cache
        uses: azure/CLI@v1
        with:
          inlineScript: |
            az afd route purge \
              --content-paths '/*' \
              --profile-name ${{ secrets.FRONTDOOR_PROFILE_NAME }} \
              --route-name ${{ secrets.FRONTDOOR_ROUTE_NAME }} \
              --resource-group ${{ secrets.RESOURCE_GROUP }}
Step 6: Testing Your Deployment
After completing all these steps:
- Verify that your website is accessible via the Azure Blob Storage endpoint URL
- Check that your custom domain (www.cloud-corner.com) properly resolves to your website
- Verify HTTPS is working correctly
- Make a change to your code repository and ensure the CI/CD pipeline deploys it automatically
Conclusion
We’ve successfully deployed a static website using Azure Blob Storage, secured it with HTTPS via Azure Front Door, configured DNS with AWS Route 53, and set up automated deployments with GitHub Actions. This architecture provides a robust, scalable, and cost-effective solution for hosting static websites. By leveraging the strengths of multiple cloud providers, we’ve created a solution that balances performance, reliability, and cost while maintaining simplicity and automation.